Mini Garden!
The only downside of going away for a month is that I will miss the heart of planting season. The nice lady at Canadian Tire assured me there would still be vegetable plants available in June, but there are a few things I wanted to get started on early. I decided to splurge on seed packets yesterday, knowing that certain plants will just have to wait another six weeks. Tomatoes, peppers and lettuce will be better from pre-grown plants anyway. There was a workshop on Wednesday that I was sorry to miss on SIPs. Sub… irrigated… planters? Or something. It was about container gardening and looked terrific. (Containers are the only way to garden when you have a three-storey high balcony and no yard.) That may have raised my anticipation of gardening season along with yesterday’s warm weather and the submission of my final paper. You may notice that I decided to incorporate some of the things you Pinterestees post on Facebook. So, how does my garden grow? Let us see…
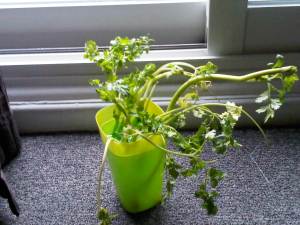
This cilantro was bought at the store (for cooking) about a month ago and I just left what remained in the fridge. In the end, I stuck it in water and it perked right up and started pushing out new shoots. Then I got hasty with the Miracle-Gro and it shriveled. Some of it lived, as you will see later. This is the pre-fertilizer picture:
One of the Pinterest/FB-inspired items is next: using eggs for sprouting seeds. I started by putting one helping of used tea leaves (and some tea bags – shredded) in the bottom of each egg, then seeds, then soil. Before I seeded them, I labeled each one with a Sharpie. I didn’t see the labeling on FB, so I’ll take full credit for the genius of it. You will notice that the sage egg didn’t handle as well as the others. I put some leftover plastic wrap under that one after. Note that eggs are waterproof and come with their own stylish carrying case.
For vegetables, I wanted something bigger than an egg, but not as big as a planter box. Since I will be away, I will bring them to my parents’ house until June. (They don’t know that yet…) So, I wanted something small enough to bring there (and bring back in June), and would allow me to plant them farther apart once they have sprouted. (Sadly, I will miss the stage of cute little sprouts.) Yogourt containers are a great size (I can even put the lids on for the trip north tomorrow), but I didn’t want the roots to grow intertwined before I separate them. I needed something to divide my yogourt containers into three or four parts, which would allow me to separate three or four seedlings in June. The flyers had just come and were laying beside me on the floor. Perfect! I know the ink will leach into the soil, blah, blah, blah, but it is biodegradable and easy. I made little pockets out of newspaper to keep my seeds apart. (Inspired by the newspaper cones of roasted peanuts in Delhi.) I don’t know how well it will work, so don’t blame me if you try it and it fails miserably. If you want to proceed, this was my process:
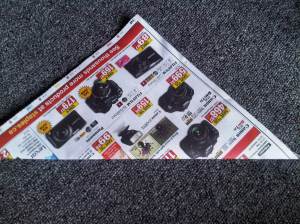
Step 1: Fold a square in half to make a triangle: (this is one quarter of a Staples flyer)
Step 2: Fold the ends in to create your pocket. Keep the edges approximately a hand width (not hand span!) apart.
Step 3: Tear off excess paper. You only need to fold over those “arms” to keep the pocket in place. Anything more than an inch is just taking up space in your container.
Step 4: Separate the two pointy edges to create your pocket. I found three fit nicely in a yogourt container.
Step 5: Fill with soil. I found that filling each section with a bit of soil, then adding more in rounds worked better than filling one whole section before the others. They stay more evenly spaced this way. I put three seeds in each section for a total of nine seeds per container. (That might be a bit much when the beets start to grow!) Each container held one type of seed.
All done! I labeled each container with a Sharpie. After this picture, I folded down the pointy parts of the newspaper, just to tidy things up.
The whole garden! Note that the cilantro is in a milk container. It was looking a bit sad after the fertilizer incident, so I put it in soil. The milk container is another steal off FB. It is waterproof and keeps the cilantro from falling over. I think it will recover once it goes outside.
If you are curious what I planted, the back row contains beets, zucchini, peas and beans. The front row is rosemary, mint, thyme, chamomile, sage and sweet basil. I am going to make a better effort to dry my herbs this year. The last of my dried basil is my favourite smell in my apartment.
Happy gardening!


